

By Melissa Souza
I have become increasingly aware of the antibiotics, growth hormones, and unsanitary practices involved in getting those perfectly wrapped steaks on the super market shelves. For about five minutes I attempted to purchase all organic meats for my family of six, and quickly realized that those costs were not feasible for our grocery budget. We grow our own produce, we raise our own eggs, so why can’t we raise our own meat? For starters, we have an acre. As much as I would love to add pigs, goats, and beef cattle to our homestead, there simply isn’t enough land to support large livestock.
We dug into this issue a bit, and came to the realization that meat rabbits were the perfect fit for our small property. In fact, meat rabbits really are an ideal choice for any homestead or farm. A pair of female rabbits can supply up to 400 pounds of meat per year, which is about the same amount of meat that a cow will provide. Rabbits, however, use feed much more efficiently then beef cattle. Four pounds of feed is needed to supply one pound of rabbit meat, compared to seven pounds of feed needed to supply one pound of beef.
Rabbit meat is also higher in protein, and lower in fat and cholesterol than beef, chicken, or pork. The Romans raised rabbits some 2,000 years ago, so this is by no means a new idea. Rabbit meat is surprisingly delicious, and very profitable if sold. Rabbit meat sells on average from $5-$10 per pound, depending on the area. The younger the rabbit, the more tender the meat. The ideal age to slaughter rabbits is 8-12 weeks.
Once we decided to invest in meat rabbits, our personal choice was to get a breeding trio. This consisted of two does and a buck. In the meat rabbit world it is considered okay to breed fathers with daughters, but not brothers with sisters. We, however, did not want any relation at all in our trio, so purchased our rabbits from separate breeders.
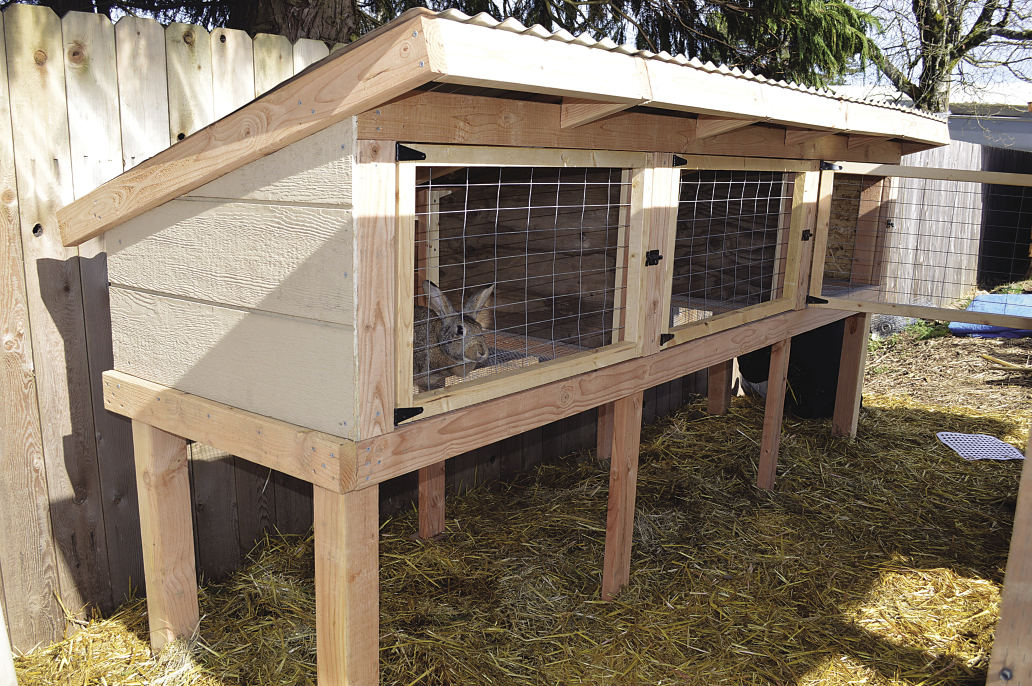
We made a three-part cage that measures approximately 10 x 2.5 feet. The frame is made out of 2 x 4s, and the back was old fencing boards that we had lying around. We try to use anything that we already have left over from past projects. The whole point is to save money. We had to purchase the 2 x 4s, the corrugated roofing, and the hinge and latch system for each door. The cage is built above ground to allow the droppings to fall straight through the wire floor.


These are approximate measurements for our hutch, so if you plan to build one similar following these steps, please make sure to measure your own pieces carefully to your frame. You can substitute many of the materials we used for materials that you might already have, but this is how we constructed this particular three-hole hutch.
Three-cage rabbit hutch
Posts:
The four outer corner posts are cut from two 4×8 posts.
Two 52-inch pieces are the front posts, and two 44-inch sections are the back posts.
The center posts are two 52-inch 2x4s for the front, and two 44-inch 2x4s for the back.
The taller posts went in front so that we could create a sloped hutch and allow for rain runoff.
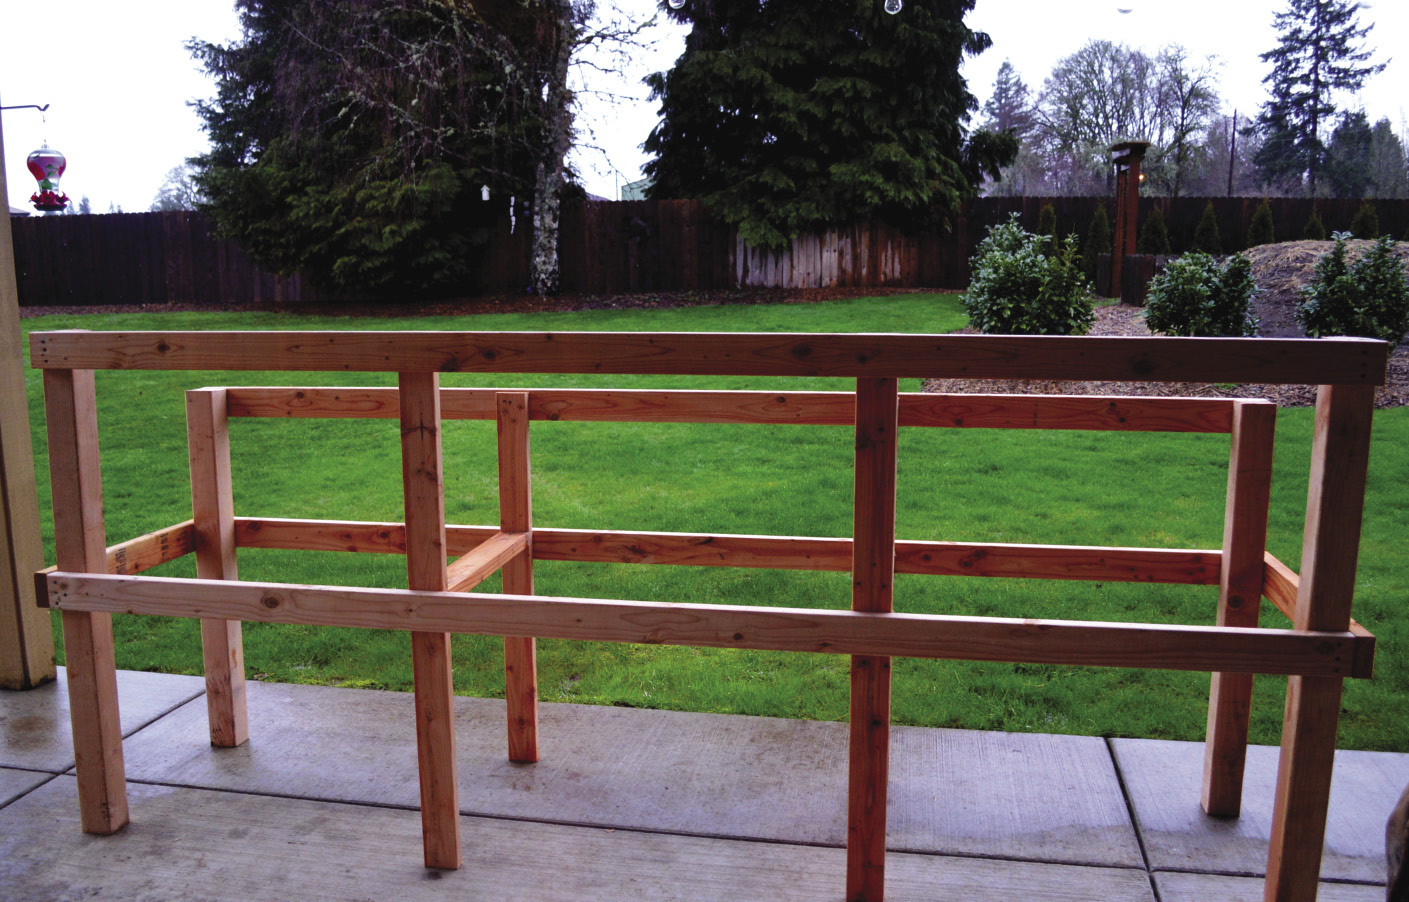
The bottom frame:
The short sides are made from two 32-inch 2x4s.
The front and back are made from two 10-foot 2x4s.
We screwed the bottom frame pieces approximately 24 inches above the ground. This space allows for a tall cage for the rabbits, and a nice space under the hutch where the droppings fall. We wanted enough space below to make it easy to scoop out that wonderful compost.
Once the bottom frame was attached to our corner 4×4 posts and our center 2×4 posts, we had a freestanding base that measured 2.5×10 feet.
The inside walls:
We designed the interior walls to slide in place. Some people use mesh walls, but this does not allow privacy for the does when they are nesting or when they have kits. If the male rabbits are bothering the does they will also spray urine at them. To avoid this, we used an old piece of plywood that we had for the interior walls.
To make the slide-in system we cut three 2×1 20-inch pieces for the front posts, and six 2×1 15-inch pieces for the back posts. We screwed two pieces to the inside of each post leaving a ¾-inch space between them.
For the plywood divider walls, we cut the ½-inch plywood sheets 21.5 inches in the front x 15.5 inches in the back x 26.5 inches long across the bottom. These simply slide into place between the attached 1×2 divider holders.
Top frame:
This is where we created the slope for the roof.
Two 33.5 inch 2x4s for the sides
Two 10 foot 2x4s for the front and back of the frame
Three-hole hutch frame from front. The front wall is higher, allowing rain to run off toward the back. It also allows for a larger cage door, which makes accessing the rabbits and cleaning the hutch much easier.


Hutch siding:
We had extra siding panels left over from building our chicken coop, so we used that for the siding pieces. Plywood or even cedar fencing slats would also work just fine.
Two 32-inch wide (along the bottom) x 21-inch tall in the front x 12 inches tall in the back
Those fit right into place, but a few small trims will probably be needed for a perfect fit.
Hutch backing:
Six 3-foot cedar fencing slats
For the back we wanted some air flow so we used some old cedar fencing slats. Rabbits tend to chew on wood so we did each hutch with its own boards so that they could be easily replaced when needed. The back of each hutch got two boards which were screwed into the frame.
Hutch flooring:
Three pieces of ½-inch metal hardware cloth cut into 36×30 sections
We laid each piece across the bottom frame in each cage, and stapled them into place. We made sure not to have any sharp edge sticking up.
Under roof cross beams:
Four 2x4s cut 26.5 inches long
We wanted a roof overhang to provide the rabbits and interior of the cages more protection from the rain. We set our cross beams approximately 2 feet apart. The back of the beams sits flush against the back 2×4 of the top frame, and screw in place. The front will stick out about 8 inches.
Eight inches in from the front of each beam we cut a 2×2 notch so that it slides onto the front 2×4 on the frame.
For a more finished look to the front of the roof frame, we cut a 2×4 into five 23-inch sections, and placed them in between the cross beams on the front so that we would have a clean flat surface going across. These were screwed into place.
Hutch roofing:
Six 26 inch x 48 inch pieces of metal corrugated panels
We overlapped each piece so that water would not drip between the cracks. This screwed onto the frame along the outside.
The hutch door frames:
We have 30×20 inch interior hutch doors on each of the three cages.
Three 30×20 inch 2x½ gage wire panels
Six 30-inch 2x2s (top and bottom of each door)
Six 20-inch 2x2s (sides of each door)
We screwed the frames together and stapled the wire panels on the inside of the frame. We then attached each door using two hinges and a sliding latch.
We used six total hinges and three latches.
Note: Rabbits chew, so we used all untreated wood for the inside of the hutch. The wire flooring allows droppings to fall through, but it can also be hard on their feet. We provided a cage mat in each box for them to rest on.

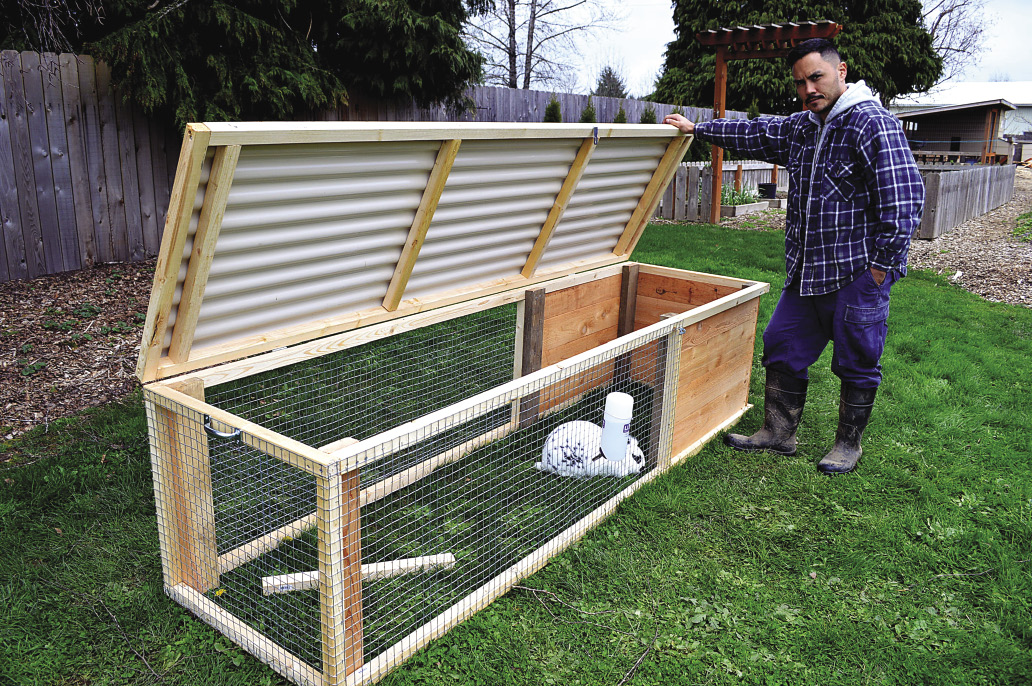
Rabbit tractor
Once we had the cage system built we also built a rabbit tractor that allows the rabbits to graze on clover or grass during the day. Grown rabbits can tolerate cold pretty well, but they do not do well in intense heat. The tractor allows us to move them into the shade during hot summer days. The kits, or baby rabbits, stay with their mothers for about four weeks, and then they are weaned and moved into the rabbit tractor until they are about five pounds, and ready to harvest.
To build the tractor we chose 2x2s instead of 2x4s to make the tractor easier to move around the yard. There is a handle on each side for easy dragging. When eight kits are growing and grazing in the rabbit tractor, it needs to be moved every day to provide fresh grazing. The sides of the tractor are metal mesh, except the privacy portion that allows them to feel sheltered. The roof is the same corrugated panel as the hutch, only it is hinged on one side to allow us to access the rabbits easily. There is also a latch on the roof to keep predators out.
Tractor frame:
Six 2x2s 21-inches long make up the corners and divider area of the tractor. We set the divider 33 inches from the end. This area is designed for privacy, and a feeling of security for the rabbits to go into. It also gives protection from wind and blowing rain.
To provide extra strength, we also secured 2x4s to the corners and divider pieces, but this is an optional step. We screwed six 2x4s cut at the same 21-inch height to the outside 2×2 frame.
The top and bottom frame:
Four 8-foot 2x2s for the front and back of both the top and bottom
Four 28-inch 2x2s for the sides of both front and back of the frame
We screwed each piece into place, attaching the frame to the 2×4 support pieces.
The siding is 1-inch metal hardware cloth that came on a 2 foot x 15 foot roll. We simply rolled it around, bending and stapling into place.
We also added metal handles to the top of the frame for easy lifting.
Privacy walls:
We used a few old cedar fencing slats that we had for the privacy section.
Three 26-inch pieces for the side wall
Six 33-inch for the front and back walls
All the top pieces had to be trimmed to fit in place. We screwed these to the outer frame.
Tractor roof:
Two 8-foot 2x2s (front and back)
Two 28-inch 2x2s (sides)
Four 24-inch 2x2s (cross beams)
We screwed the outer frame together, and then screwed the cross beams into place, leaving equal distance between them.
We attached the back of the lid’s frame to the back of the tractor frame using 4-inch metal hinges. We also attached a metal latch to the front to prevent predators from entering the tractor.
The roofing is corrugated and cut into an 8-foot x 28-inch sheet and screwed into place.
A female rabbit can be bred between 6-8 months depending on the breed. When you are ready to breed you take the female to the male. You know he “completes” his task when he falls over. Make sure to let them breed at least two times because a female rabbit has two sides, and each side needs a separate breeding to fertilize all of her eggs. They take 29-31 days to kindle, or give birth. The kits can be weaned at 4-6 weeks, and then the doe can be bred again. The litters range from 4-10, with the average being 8 kits per litter. These are highly productive animals that are quiet, provide natural meat, and produce garden ready compost. They are the perfect fit for families looking for a practical way to raise their own meat.

Cost analysis for raising meat rabbits
I called around for the prices of feed. The most expensive was $23.99 and the cheapest was $15 for a 50-pound sack. (It pays to shop around.) Going with the cheapest, that’s 30 cents a pound for feed which figures to about $4.56 in feed to grow your rabbit to the 4¾-pound fryer size. The dressed carcass is going to weigh about 2½ pounds. The result is that you will have paid about $1.82 per pound for dressed-out meat. But keep in mind that when you try to estimate your costs, you also have to factor in what you’re spending to feed your breeding buck and does. This will bring your costs to about $2 per pound.
How much meat does this all figure out to? The offspring from one doe will produce about 90 pounds of dressed-out meat for $180 a year. Two does, 180 pounds for $360. Three does, 270 pounds for $540. However, you can drastically cut your costs to less than one dollar a pound, by using garden and kitchen scraps to supplement their feed. But be careful, because there are many things, such as beans and cruciferous vegetables, you should not feed your rabbits or should only feed to them in small quantities. Learn what you can and cannot supplement their diet with. If you have access to a computer, one site to check out is http://www.bio.miami.edu/hare/diet.html.
Hey, can I ask why the rabbits in the tractor don’t dig into the ground?
Left out several steps and measurements in this. Very confusing.
I finished the elevated hutch build this weekend. It’s a great build and I can’t say enough positive things. The only change that I made, was a hinged roof for more access and ease of removing and installing the partitions between sections. 10/10.
I didn’t have any spare lumber laying around so I had to buy everything. My total cost in materials was about 400 dollars. Superior value for such a solid build that would have cost me at least double if not closer to 1000 to buy pre-built.
Please PLEASE never use hardware cloth for flooring!!! The wire is usually 19 guage or smaller and this is very dangerous for rabbits. Being on such thin wire can give them sore hawks, nasty wounds on the bottoms of their feet! 16 or better yet 14 guage 1/2×1 inch wire is safe for flooring. It’s also best practice to give them a piece of wood or tile (in the hot months) to get up off the wire should they choose to.
Thank you for the great idea. We built a 3 hole hutch, using your design, but made modifications to better suit us.
Thank you! I used this design as a basis for a box for quail, and I wanted to report how it’s worked.
First, a few changes are needed to make it safe, because it’s not being used as a tractor (day use for rabbits) but rather as a permanent enclosure for the birds. So not only did I enclose the bottom with chicken wire to keep rats from getting in and eating the eggs, I also replaced the corrugated top panel with two wood panels (for shade) and more chicken wire, as raccoons would tear the corrugated panel apart and eat the birds the very first night otherwise. I put two latches on the lid, which we lock each night with padlocks (again, to keep the nocturnal predators from eating the birds). Because we’re not using it as a tractor (moving it around the yard so the rabbits can trim a lawn) and instead housing birds that need to scratch in the dirt to eat and bathe, I filled in the bottom of the box with between three and four inches of dirt and mulch. One concern I had was how to prop the lid open for feeding and changing the birds’ water; I was uneasy about mounting a pneumatic arm on such thin wood as makes up the frame. As an alternate, we have a 4′-long board that we use to prop the lid open when we need to feed the birds or collect eggs. The eggs have been a problem, though: they haven’t been laying since we moved them into this box. I suspect that this is due to stress. The quail are VERY exposed in this box, even with the 2/5th privacy section. Cats and predatory birds come by often to observe the quail in the box; the quail are safe, but they don’t feel safe with predators just a few inches away. So we’re considering what other modifications we can make: growing some grass in the box to act as a screen, or enclosing the box with something more opaque so that curious killers won’t find the box so interesting.
I wish I read Kelsey’s comments first, and I wish the authors read her comments too. The supply list measurements are incorrect. Beware! You’ll end up wasting some wood if you don’t sketch it out for yourself first.
What wire is best for the bottom that they can’t chew through?
What breeds do you use? And what are the dimensions of the actual living space?
Thanks!
Kelsey, I wish I had read your comment before I cut all of my pieces per instructions. Lesson learned!
There is an amazing rabbit tractor. Similar to the design you use, but it has a space for rabbits to get up off the ground in the case of heavy rain and puddles. It also has wheels and handles to make it easy to move. Thought you might be interested in it: https://homesteadrabbits.com/best-rabbit-tractor/
I haven’t built the cage yet.still in the old one.also need chicken coops .I got a drill screws.fence clips .My question is about the staples.Im a woman I don’t have the hand strength for a reg stapler I was wondering what you used an if you progressed to a new one.thanks.mary
We’ve had ours escape a billion times. We put 2″ chicken wire on the bottom to keep the smaller sneakier ones in, but that makes it crazy heavy to move (since you’re lifting the tractor with the weight of the rabbits, too). I thought about doing slats on the bottom, especially near the edges, where they like to dig. Bun buns are hard to catch once they escape, but we’ve gotten REALLY good at it. I’d love to hear what other people are doing to keep their rabbits on grass.
This was exactly what I was looking for….but not for rabbits. I am planning on putting my quail in it! Just so this does not happen to anyone else who wants to build this, the cuts are a little off on a couple pieces (I found this out after having all the wood cut to length for me at the lumber yard). The 6 2×4’s need to be cut to 24″ as they run all the way from the bottom to the top on the inside unlike the 2×2 supports that run in-between the top and bottom frames. Also, the 2×2 cross beams that go in the roof section need to be cut to 25″ as the 24″ stated is too short. Other than that, it is going together really nicely! Thanks so much for sharing your rabbit run build!
How much did it cost to build your hutch?
We built the same hutch, but our Flemish giants chewed through the hardware cloth flooring! So we are looking for a better design……
Rhonda, i raise my rabbits in a very large colony on the ground. Grow outs dont usually tend to dig but the does will dig when preparing a nest and also when its hot to try and get cool. I used 1×2 inch wire fencing on the ground and over time added hay and the poop eventually bury the wire so its not visible. So yes, they will try to dig.
I built your tractor and added a few extras. We put a wired wall at the privacy area with a door. We lock our rabbits up at night in that area. We also added a sifter feeder to the privacy area to help our grow outs slowly transition to grass all the time. We don’t have problems with our rabbits escaping nor digging. We also added tires to the back for easy movement. Thank you so much for the idea and sharing your plans. My kids and I are very happy with the design.
Would it be ok to make a partitioned tractor for my 3 breeding rabbits? I always see breeders in raised cages. Also, have you ever had them dig out and escape?